Thursday, November 26, 2015

Zuddy's Shaker

"Zuddy's Shaker" is a pattern I spent all last summer working to perfect... at this point I couldn't be more pleased with it's performance so I hope you will give it a try as well. As summer progressed the bass seemed more and more to be eating it tail first, then hesitating (with the fly in their mouth) to make sure it was real before turning... this is the reason I added the loop of Fireline, so a stinger hook can be added if this is occurring often. You can fish this fly on a floating line with great success,  I did find however that an intermediate bass line is slightly better. I generally work this fly pretty fast but don't be afraid to experiment with retrieval speed to find what works best. Use the rod tip and strip/pause retrieve to give the fly an irrisistable action. White is my favorite color for this fly but feel free to experiment with other color combos as well.


The photo above shows the materials used for this pattern.


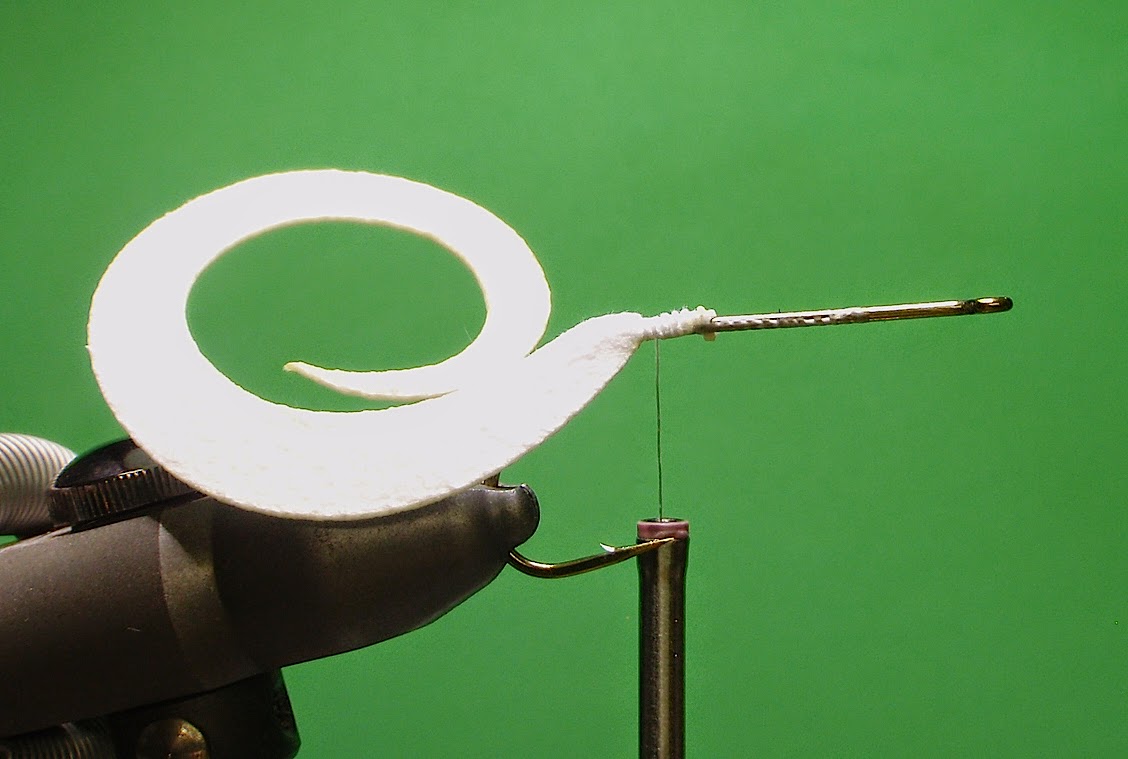
Step 1. Place a Daiichi 2461 Size 1 hook in your vice. Cut an 8 inch long piece of 14lb test Berkley Fireline and thread the tag ends through the top of the hook eye as shown. Start wrapping white thread over the Fireline on top of the hook. My choice for thread on this fly is Uni-Thread 3/0 because it will stretch... this will be handy for a future step. This loop will be used to attach a stinger hook if the fish are short striking.


Step 2. Fold the tag ends of the Fireline back against the underside of the hook and continue wrapping all the way to the bend of the hook, making sure the Fireline stays on top of the hook shank.


Step 3. As seen in the previous photo, advance your thread to the center of the hook (between the hook point and eye), then attach aluminum Sea Eyes securely to the top of the hook. This is where a stretchy thread comes in handy. As you can see in this photo I have pre-applied the Pearl Eyes with 5 minute epoxy (Zap-a-Gap is sufficient as well)


Step 4. Jam a 4mm Glass Rattle against the back of the Sea Eyes and secure with thread wraps, no glue will be needed as the Sea Eyes help keep the Rattle from turning.


Step 5. Add a sparse clump of UV White Buck Tail to the top of the Rattle.


Step 6. Add 3 strands of Pearl Flashabou above the Buck Tail... folded over the thread so as to create 6 strands total.


Step 7. Tie in a 5 to 6 inch long piece of UV Pearl Polar Chenille on top of the Rattle and advance thread forward to just in front of the Eyes.


Step 8. Wind the Polar Chenille forward over the Rattle, under the Eyes and make a few turns in front of the Eyes as well.


Step 9. Add a sparse clump of UV Buck Tail on top of the hook as shown, securing tight enough that it won't move when you trim it.


Step 10. Trim the tag ends of the Buck Tail and add a few more thread wraps to secure it in place.


Step 11. Turn the fly upside down and repeat Step 10 on the bottom side of the hook as shown above.


Step 12. Finish the fly with a nice thread wrapped head and you are good to go!

Thanks for your support! - Matt "Z" Zudweg


Friday, February 6, 2015

Darth Hopper - Bass version

A number of years ago I was fishing with friends out west during the late August hopper season. We were doing especially well on my hopper pattern I eventually named "Darth Hopper". The following summer I was taking a client bass fishing and he really wanted to use a giant spider pattern he had been tying... it looked like a large version of Darth Hopper with some minor changes. Admittedly I was skeptical, but became very surprised at how well the bass went after it and I soon began tying Darth Hopper in a larger size. I did change the head due to the thicker foam I was using and swapped the orange legs for olive (I've never had good bass fishing with orange or red legs). Anyway, for the next summer bass season this larger version became my go to fly for numerous trips.... especially for clients who had difficulty casting a more wind resistant popper.
After the initial plop on the water, it's pretty quiet and subtle... kinda of sneaky, like a slider. It's especially good when the water temp isn't quite warm enough for the real aggressive popper bite, but you still have your heart set on bringing them to the surface. Once it lands, work it similar to how you would work a popper, twitch/pause... twitch/pause.


Step 1: Place a Daiichi 2460 size 1 hook in your vise. Using Uni-Thread 3/0 in a color similar to your foam, tie in and work it to the rear of the hook, just before the bend.

Step 2: Wind some Ice Dub onto your thread and work your way toward the front of the hook about 1/2". As you can see in the photo above, I stopped the dubbing where the rear body segment meets the middle segment... this will be our tie in spot.
My favorite colors for Ice Dub are Olive and Peacock Black.

Step 3: Place a Hopper body on top of the hook and tie it snug with 4 to 5 wraps. I make the Hopper bodies with 5mm Funky Foam (Hobby Lobby) and a Beavertail die cutter (Hareline). Pre-cut bodies available at www.boneyardflygear.com on the Fly Gear page.
My favorite body colors are Tan, Green and Black.

Step 4: Tie in (4) Grizzly Round Rubber Legs (Hareline) on top of the body, leaving about 1 1/4" to the rear and the rest toward the front.
Not too tightly as we will be moving the legs soon.
My favorite color is Olive for the legs.

Step 5: Place some more Ice Dub onto your thread, hold the legs and body back and wind the thread forward the the next segment juncture (almost to the front of the hook). 

Step 6: Tie the body in snugly again with 4 to 5 tight wraps.

Step 7: Grab the longer portion of legs and tie them in on top of the front segment juncture as shown here. Leave an arch in the middle as shown. Again, don't tie the legs in too tightly.

Step 8: Cut the legs in the center of the arch.

Step 9: Using both hands, pull two legs to each side of the body and even out the lengths so they are all similar. Spend some time getting the body and legs positioned as neatly as possible.

Step 10: Using a Flexible cement such as Dave's Flexament or Softtex, place a drop in each section where the thread pinches the legs and allow to dry completely. Do NOT use Zap-a-Gap or similar non-flexible glue here or the legs will get funky.

You are finished! Yours should look similar to this when completed.

Visit my website for more information on guide trips and gear.

Tuesday, February 3, 2015

Zuddy's Sham Shad

So last year my friend Pat Cohen (www.rusuperfly.com) came out with some great products made from ultra suede... a thin but super tough suede material. He has all kinds of neat patterns from crayfish to hellgrammite shapes, including what he calls "Attractor Tails". They remind me of the mister twister rubber tails I fished as a kid. I knew I needed to experiment with them so I loaded up on all sizes and began to play. After a summer of experimenting with all sorts of combinations I ended up with what I call the "Sham Shad". Don't get me wrong, I still spent plenty of time last summer with a Zudbubbler on the end of my leader, but I have to admit I fished the Sham Shad way more than I care to tell. The action on this fly from the attractor tail coupled with deer hair head and huge mallard flank is unbelievable... and the bass agreed. The best days I had with it were in the clearest of water conditions and I fished it super slow with a twitch/pause retrieve. I mostly fished it on a floating line with intermediate leader, but an intermediate line is just as effective if not more. It's going to be hard to top this one going forward. It's a super simple tie, so give a try!


Step 1. Insert a TMC 8089 size 6 hook (or equivalent) in your vise. Using a gelspun thread such as GSP 100 tie on and work your way to the bend as shown here.


Step 2. Grab a size Medium Attractor Tail from the package. Tails are available at www.boneyardflygear.com on the Fly Gear page.


Step 3. Tie the tail on top of the hook so it lays horizontal as shown.


Step 4. Using the largest mallard flank you can find, tie in by the tip with the feather cupped toward the attractor tail. Strip back the fluff so you have a clean tie in place on the stem for the next step.


Step 5. Dub some white pearl Ice Dub onto your thread and wind forward, leaving yourself around 3/8" behind the hook eye for the deer hair head. If the dubbing is too tight, you can tease it a little so it looks like the photo above.


Step 6. Palmer the mallard flank forward through the Ice Dub and tie off.


Step 7. Tie in a clump of white deer hair (or bleached elk hair) on top of the hook (sculpin style), trim the bottom side flat if you wish. Whip finish and add a little Zap a Gap to the underside of the deer hair head. Simple as that!


Here's a photo of the finished fly from a slightly forward angle.

Visit my website for more tutorials, guide trip info and gear. www.zflyfishing.com

Thanks for your support! -Z